Building a survey
Here is how to build a survey
Creating the project
- Lets create a new project for our experiment. Open your terminal and type the following command1.
1 If you are not sure why, please refer to the Creating a project section
otree startproject myexperimentYou will be promped to include sample games or not. You can choose either but to keep it simple, I suggest you not to (type “n” and press enter).
Now, you should see a new folder called “myexperiment” in your current directory. Let’s go inside the folder and test if everything is working.
cd myexperiment
otree devserver- If everything is working and you can access to otree admin page, you can stop the server by pressing
Ctrl + Cand continue.
Creating the app
- This time before running experiment, we will create a new app, which will contain our survey.
otree startapp surveyThis command creates a new folder called
surveywhich contains a template for our app. We will be modifying the files in this folder to create our survey.This doesn’t add the app to our experiment yet. We also need to let oTree know that we would like to add this app to our experiment. For that, go to the
settings.py(in ourmyexperimentdirectory) and modify the following lines.
settings.py
# ...

SESSION_CONFIGS = [
     dict(
         name='my_survey',
         app_sequence=['survey'],
         num_demo_participants=3,
     ),
]

# ...
Here we basically tell oTree that we would like to have a session called my_survey and it will only contain the app called survey.
SESSION_CONFIGS is a list of dictionaries defined in the project settings file settings.py. Each dictionary represents a set of configurations for an experiment session.
Here we add a new dictionary to the list. The dictionary has three keys:
name: Name of the session configuration (you can choose any name you want, but it should be unique and contain only letters, numbers and underscores. No spaces or hypens are allowed.)app_sequence: List of apps that will be included in the session. In this case, we only have one app calledsurvey.num_demo_participants: oTree opens a “test” page by default called Demo. This is the number of links it creates for that demo. Usually same number or a multiple of the group size in an experiment. Not very important for the real experiment.
It is common to have one session config for each treatment.
- Now, we can run the server again and see if our app is added to the experiment. First make sure that you are in the
myexperimentdirectory and then run the server:
otree devserver- We can keep the server running while modifying the files. In most of the cases you don’t need to restart the server to see the changes. (while using
devserverwhich is for development.)
Structure of our app
oTree file and folder structure might look intimidating at first. But it is not. Before we go any further, let’s take a look at the structure of our app.
myexperiment
├── __pycache__
├── _static
├── _templates
├── db.sqlite3
├── requirements.txt
├── settings.py
└── survey
    ├── MyPage.html
    ├── Results.html
    ├── __init__.py
Directories and files we care about generally: - _static: If we have some files that oTree needs to access (e.g. images) we put them in this folder. - survey (or any other app folder): - __init__.py: This file is where the real magic happens. We will be writing our code mostly in this file. The logic of our app, data related things etc. (back-end) will be in this file.
- `HTML files`: In every app, we have an HTML file for each page. Most of the things user see (front-end) will be in these files.settings.py: This is the main settings file for our experiment. We will be modifying this file to add new apps, add some variables we need throughout whole experiment here.
Let’s take a look at the __init__.py file in our survey folder. So far it looks like this.
__init__.py
from otree.api import *


doc = """
Your app description
"""


class C(BaseConstants):
    NAME_IN_URL = 'survey'
    PLAYERS_PER_GROUP = None
    NUM_ROUNDS = 1


class Subsession(BaseSubsession):
    pass


class Group(BaseGroup):
    pass


class Player(BasePlayer):
    pass


# PAGES
class MyPage(Page):
    pass


class ResultsWaitPage(WaitPage):
    pass


class Results(Page):
    pass


page_sequence = [MyPage, ResultsWaitPage, Results]doc: This is a docstring. It is used to describe the app. It is not necessary but it is a good practice to have one.
Constants
C: This is a class that contains some constants. We will be using this class to define some variables that we will be using throughout the experiment. For example, if we want to have a variable calledagefor each player, we can define it here.
Models
Subsession,Group,Player: These are classes that represent the subsession, group and player. We will be using these classes to define the logic of our experiment. For example, if we want to have a variable calledagefor each player, we can define it here.This part is necessary for every app and the names of the classes should be exactly the same. We often modify by adding new variables (attributes, if we want to be precise) to these classes
Pages
MyPage,ResultsWaitPage,Results: These are classes that represent the pages in our app. We will be using these classes to define the pages in our app. For example, if we want to have a page calledMyPagein our app, we can define it here.We can delete the pages we don’t need and add new pages freely. Each page is defined by a class. The name of the class is the name of the page. It inherits from
Pageclass (orWaitPageif it is a wait page but we’ll come to that later). And then a HTML file should accompany to the page with the same name. For example, if we have a page calledMyPage, we should have a HTML file calledMyPage.htmlin the same folder.
Page sequence
page_sequence: This is a list of pages that will be shown to the user. We will be using this list to define the order of the pages in our app. For example, if we want to have a page calledMyPagein our app, we can add it to this list.
Prepare the files
- We can start by deleting the pages we don’t need. Let’s delete the following lines:
__init__.py
# ...
class ResultsWaitPage(WaitPage):
    pass

class Results(Page):
    pass
and remove them from the page_sequence list. So it should look like this:
__init__.py
# ...
page_sequence = [MyPage]- We can delete the
ResultsWaitPage.htmlandResults.htmlfiles as well.
Looking at MyPage.html
Now lets take a look at MyPage.html file. Lets modify it a little bit.
MyPage.html
{{ block title }}
Welcome to our survey
{{ endblock }}

{% block content %}

    We would like you to answer the following questions.
    Please do not leave any question blank.

   {{ formfields }}
   {{next_button}}
As you can see it is formed of some text and some blocks and variables.
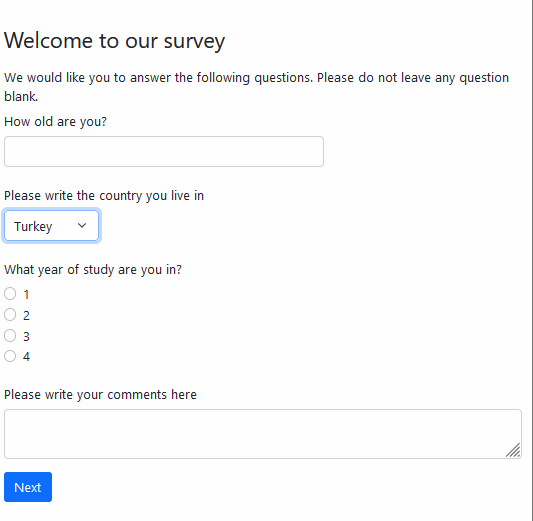
Let’s take a look how it looks now:
Creating our survey
When we start programming an individual experiment, we usually follow these steps:
- Define the variables we need in
Playerclass. - Create the pages classes.
- Create the HTML files for each page.
For our survey, we need to ask the following questions:
- Age (Integer)
- Country (will be saved as text: String.)
- Any additional comments.
Now, let’s add these variables to our Player class. Remember that the way we create these field is by using the field types listed in oTree documentation.
__init__.py
# ...

class Player(BasePlayer):
    age = models.IntegerField(label='How old are you?')
    country = models.StringField(label='Please write the country you live in')
    comments = models.LongStringField(label='Please write your comments here')

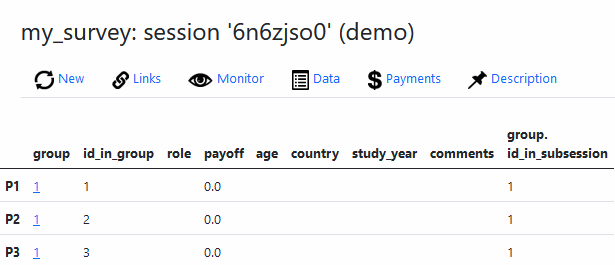
# ...Now that we have the required variables, their columns will appear in the data. But we still need to tell oTree which page to put them.
We should go back to our MyPage class and add the fields we want to show in this page.
We have to provide two things to oTree to show the fields in the page: - form_model: Who (which class) has the fields we want to get the input to. We are programming an individual experiment and our variables are in Player class. So we should write form_model = 'player'. This field expects a string of the class name. - form_fields: We should tell which fields want to get input to. This field expects the names of the fields in a list.
Let’s do it:
__init__.py
# ...
class MyPage(Page):
    form_model = 'player'
    form_fields = ['age', 'country', 'comments']

# ...
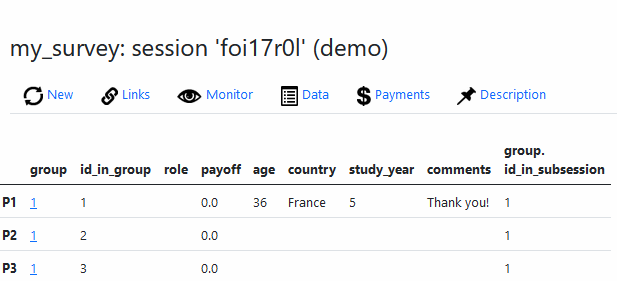
Now, we can go re-run our experiment and see how it looks now. Then lets try it and see that the data is saved correctly.
Formatting the survey
We have a functional survey but participants should all the information by themselves. It is better to provide some ready-made options for them and set the limits. Luckily oTree provides some options for us. We can add some arguments to the fields to modify them.
Let’s start with the age. We can set the minimum and maximum age by adding min and max arguments to the IntegerField.
age = models.IntegerField(label='How old are you?', min=18, max=100)Now if you try to add a value outside of this range, you will get a pop-up warning.
Next, assume that we are running this experiment in few selected countries. We can provide a list of countries to the StringField by adding choices argument so that participants can only choose from the list. This argument expects a list of options.
country = models.StringField(label='Please write the country you live in',
                            choices=['Algeria', 'Columbia', 'France', 'Kenya', 'Turkey', 'Vietnam'])
Next we would like to add radio buttons for each study year. We can do this by adding choices argument to the IntegerField. This argument expects a list of options. We can also add widget=widgets.RadioSelect to make it a radio button.
study_year = models.IntegerField(label='What is your study year?',
                                 choices=[1, 2, 3, 4],
                                 widget=widgets.RadioSelect)
This is how our code looks now:
__init__.py
# ...

class Player(BasePlayer):
    age = models.IntegerField(label='How old are you?', min=18, max=100)

    country = models.StringField(label='Please write the country you live in',
                            choices=['Algeria', 'Columbia', 'France', 'Kenya', 'Turkey', 'Vietnam'])

    study_year = models.IntegerField(label='What year of study are you in?',
                                 choices=[1, 2, 3, 4],
                                 widget=widgets.RadioSelect)

    comments = models.LongStringField(label='Please write your comments here')

# ...
Our survey looks pretty good now. For other options, see the Forms section in oTree documentation.


