Creating an oTree project
Without much talk, let’s dive in and create a new oTree project. Before we start, a quick note: you might feel distracted or discouraged by the terminology at first—please don’t. Some concepts will be explained as we go, and others will become clearer later on.
Here comes the first one: In oTree terminology, a project is a folder that houses your experiment. Whenever you have a new experiment, it’s advisable to create a new project and install oTree specifically for that project1.
1 Don’t worry—you don’t need to reinvent the wheel each time. Moving parts of your experiments (apps, pages, tasks, etc.) can be transferred from one project to another. We’ll cover this in a later chapter.
In many types of software, you may be accustomed to installing the software separately from the project and then opening your project files with it. In oTree, however, the oTree software is tied directly to the project and should be installed each time you create a new one. This may feel confusing at first, but once you get used to it, you’ll see how convenient it is.
How to Create a New Project
- First, open a terminal (or command prompt) window. 2
- Navigate to the folder where you wish to create your new project. Generally, this folder will contain two essential items:
- Your project files (template generated by oTree)
- A virtual environment (a folder containing all the packages required for your project)
- Your project files (template generated by oTree)
2 For more details on using the terminal, refer to the Crash Course: Terminal.
While your virtual environment can reside anywhere on your computer, it’s convenient to keep it in the same folder as your project files so you don’t have to search for it each time. For more details, refer to the section on virtual environments, Virtual Environments.
Step-by-step Instructions
Open your terminal. Create a new parent folder for your oTree project and virtual environment.
mkdir myexperimentNavigate into this folder.
cd myexperimentCreate a virtual environment inside this folder 3.
python3 -m venv venv(Try
pythoninstead ofpython3if you get an error.)
3 The first part of the command (python3 -m venv) tells Python to use the virtual environment module to create a new virtual environment. The second part (venv) is the name of the folder that will be created. You can name it anything you want, but venv is a common convention. For example, python3 -m venv mybeautifulvenv would create a virtual environment named mybeautifulvenv.
Activate your virtual environment.
For Mac/Linux:
source venv/bin/activateFor Windows:
venv\Scripts\activateInstall oTree in your virtual environment.
pip install otreeCreate a new oTree project.
otree startproject otreetestYou will be prompted to include sample games. Press
yand Enter to include them. (If you encounter errors, try again but this time say no to the sample games instead.)Navigate to your project folder.
cd otreetestRun your project.
otree devserverYou should see output similar to this:
Open your browser to http://localhost:8000/
To quit the server, press Control+C.
If you see this, your oTree server is running locally until you stop it (Ctrl+C) or close the terminal. 4
Go ahead and test it! Open a browser and navigate to http://localhost:8000. You should see Demo page of oTree admin panel. If you see this, congratulations! You have successfully created your first oTree project.
4 If you haven’t please start over and try to troubleshoot if you get some errors. You can try AI chat assistants to better understand the error messages. If you still can’t figure it out, please ask for help in the oTree forum.

The administrator panel of oTree is what you are using to test and control your experiments. We will talk about it soon. But first, feel free to click around and explore the different options available to you.
Once you are done, you can stop the server by pressing Ctrl + C (Windows/Linux) or Cmd + C (Mac).
After that, let’s break down on what we did.
Anatomy of an otree project
We indeed wrote a lot of commands, and it generated a lot of folders and file. In my courses I often say at this point: “If you managed until that point successfully, you have survived the hardest part of oTree!”. And it’s not a lie. From what I have seen, “starting an oTree project” could be unintuitive:
- First we create a folder.
- Then we create a virtual environment.
- Then we activate it.
- After that, we install oTree (inside the virtual environment)
- And then create a new project.
But you have to these steps only once for the initial setup. After that it is only about running the project. And as you go further, it will be like second nature to do these steps for each new experiment. At least this is what we’d like to achieve.
Project Structure
If you go through the steps above, probably you see a folder structure like this: 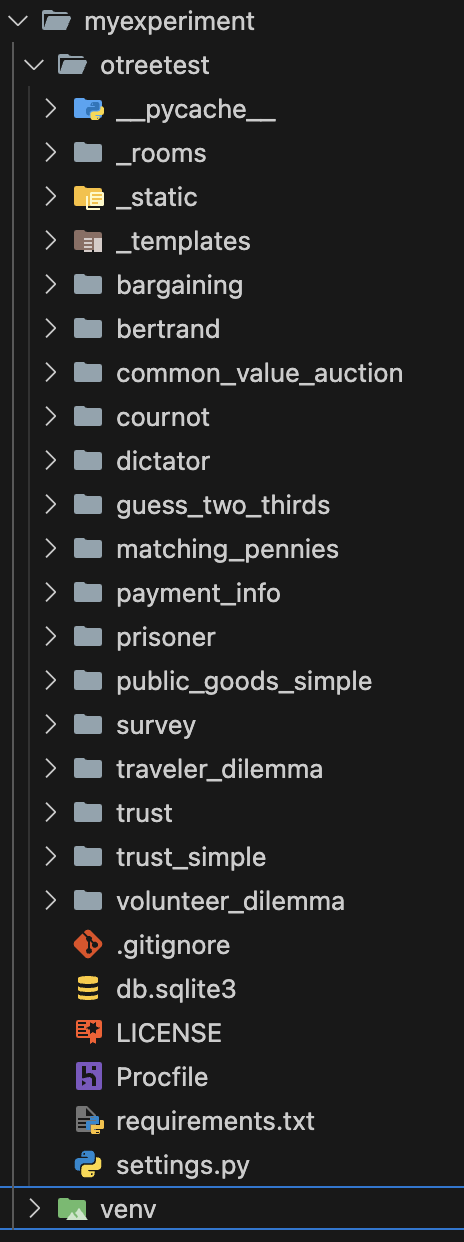
myexperiment: This is just a parent folder, holding two things:venv: This is the virtual environment folder. It is a Python thing containing all the dependencies for your project. You can just ignore what is inside that folder, pretty much all your oTree career. You don’t really need to deal with that folder except for activating/deactivating the virtual environment. But for now, just know that it exists to keep your project dependencies (including oTree software itself!) ready for you and while being isolated.otreetest: This is the folder for your actual oTree project, containing all the code and files for your experiment. Since we included sample games, you will see bunch of folders that might sound familiar to you inside this folder. These areapps, which contain their relevant oTree codes. And also one relevantsettings.pyfile, which is the main configuration file for your oTree project. But we will learn all of that by doing in the following chapters.